NỘI DUNG
Cài đặt Zimbra 10 Open Source Edition trên Ubuntu 20.04
Zimbra Collaboration Suite (ZCS) là một trong những giải pháp hợp tác và quản lý email mạnh mẽ và phổ biến trên thị trường. Với tính năng phong phú và khả năng tùy chỉnh cao, Zimbra là lựa chọn lý tưởng cho các tổ chức và doanh nghiệp muốn triển khai hệ thống email doanh nghiệp. Trong bài viết này, chúng ta sẽ hướng dẫn từng bước cách cài đặt phiên bản Open Source của Zimbra 10 trên hệ điều hành Ubuntu 20.04.
Ubuntu 20.04 LTS, với sự ổn định và hỗ trợ lâu dài, là một nền tảng lý tưởng để triển khai Zimbra. Cài đặt Zimbra trên Ubuntu 20.04 không chỉ mang lại sự ổn định và bảo mật mà còn cung cấp hiệu suất tối ưu cho hệ thống email của bạn. Bài viết này sẽ hướng dẫn bạn từ những bước chuẩn bị cơ bản, cài đặt phần mềm, đến cấu hình và quản lý hệ thống Zimbra để đảm bảo rằng bạn có một môi trường làm việc hiệu quả và dễ dàng bảo trì.
Bước 1: Thiết lập môi trường
- Tắt IPv6
Trước khi đi vào cài đặt bạn hãy tắt IPv6 trên Ubuntu, nếu bạn chưa biết cách tắt hãy xem bài viết tắt IPv6 tại đây
- Thiết lập bản ghi DNS
Bạn hãy tạo sẵn bản ghi MX và bản ghi A như sau
| Tên | Loại | Giá trị |
| @ | MX | mail.mydomain |
| A | IP Server |
- Thiết lập file hosts
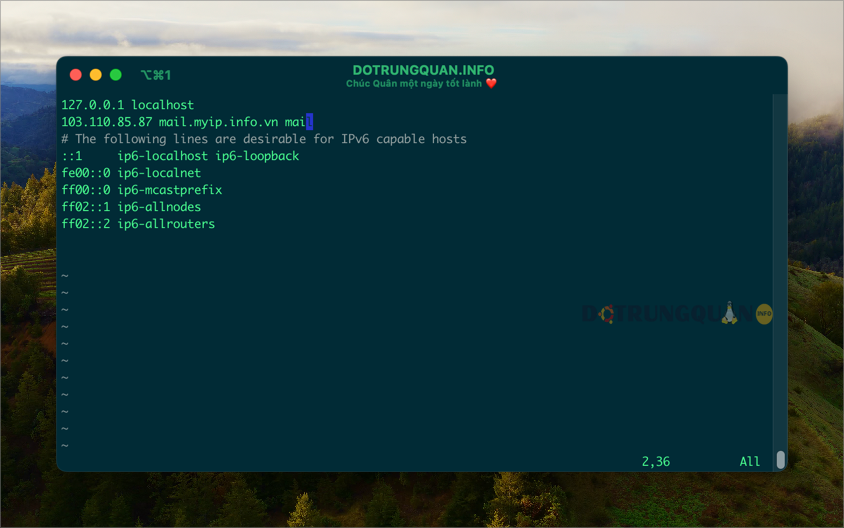
Bạn mở file /etc/hosts sau đó thêm vào các giá trị sau. Lưu ý hãy thay 1.2.3.4 và mail.mydomain mail thành thông tin của bạn
1.2.3.4 mail.mydomain mail- Thiết lập hostname
Thay mail.mydomain thành thông tin của bạn
hostnamectl set-hostname mail.mydomain
exec bash
Lưu ý: Trường hợp tên miền bạn chưa cấu hình bản ghi MX bạn hãy cài đặt cài đặt DNS Server để cấu hình sử dụng

Cài đặt DNS server (Áp dụng khi chưa trỏ DNS hoặc sử dụng local)
- Vô hiệu systemd-resolve
systemd-resolve sử dụng cổng 53 do đó bạn cần vô hiệu nó để cài đặt dnsmasq
systemctl disable systemd-resolved
systemctl stop systemd-resolved- Gỡ bỏ symlink
rm /etc/resolv.conf- Tạo resolv.conf
nameserver 127.0.0.1
nameserver 8.8.8.8
nameserver 1.1.1.1
search mydomain- Cài đặt dnsmasq
apt install dnsmasq- Cấu hình dnsmasq
vi /etc/dnsmasq.confSau đó bạn thêm vào các dòng sau. Và nhớ thay 1.2.3.4 thành IP của bạn. mydomain thành tên miền của bạn.
server=8.8.8.8
mx-host=mydomain,mail.mydomain,10
host-record=mydomain,1.2.3.4
host-record=mail.mydomain,1.2.3.4- Khởi động lại dnsmasq
systemctl restart dnsmasqBước 2: Cài đặt Zimbra 10 Open Source Edition trên Ubuntu 20.04
Bạn hãy tải xuống Zimbra 10 OSE cho OS của bạn từ liên kết này: https://techfiles.online/zimbra/ . Sau đó lưu nó vào thư mục /opt/
Tôi khuyên bạn nên chạy lệnh trong screen trước khi cài đặt Zimbra. Vì thời gian cài đặt sẽ diễn ra khá lâu.
Sau khi tải và upload vào thư mục /opt bạn sử dụng các lệnh sau để giải nén và cài đặt.
cd /opt/
tar -xvf zcs-10.0.8_GA_0324.UBUNTU20_64.20240702113708.tgz
cd zcs-10.0.8_GA_0324.UBUNTU20_64.20240702113708
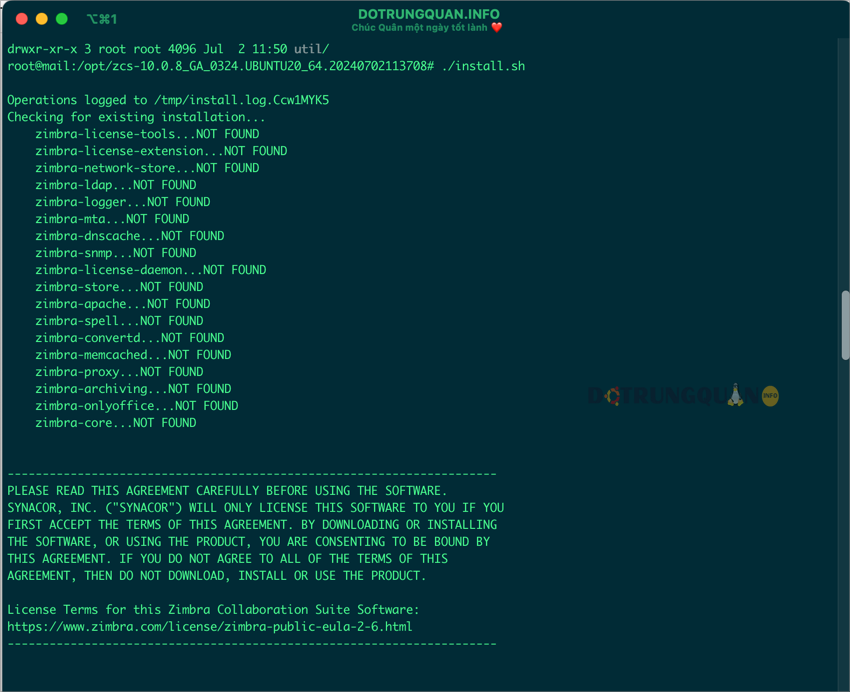
./install.sh
Ảnh bên dưới là các tiến trình cài đặt.

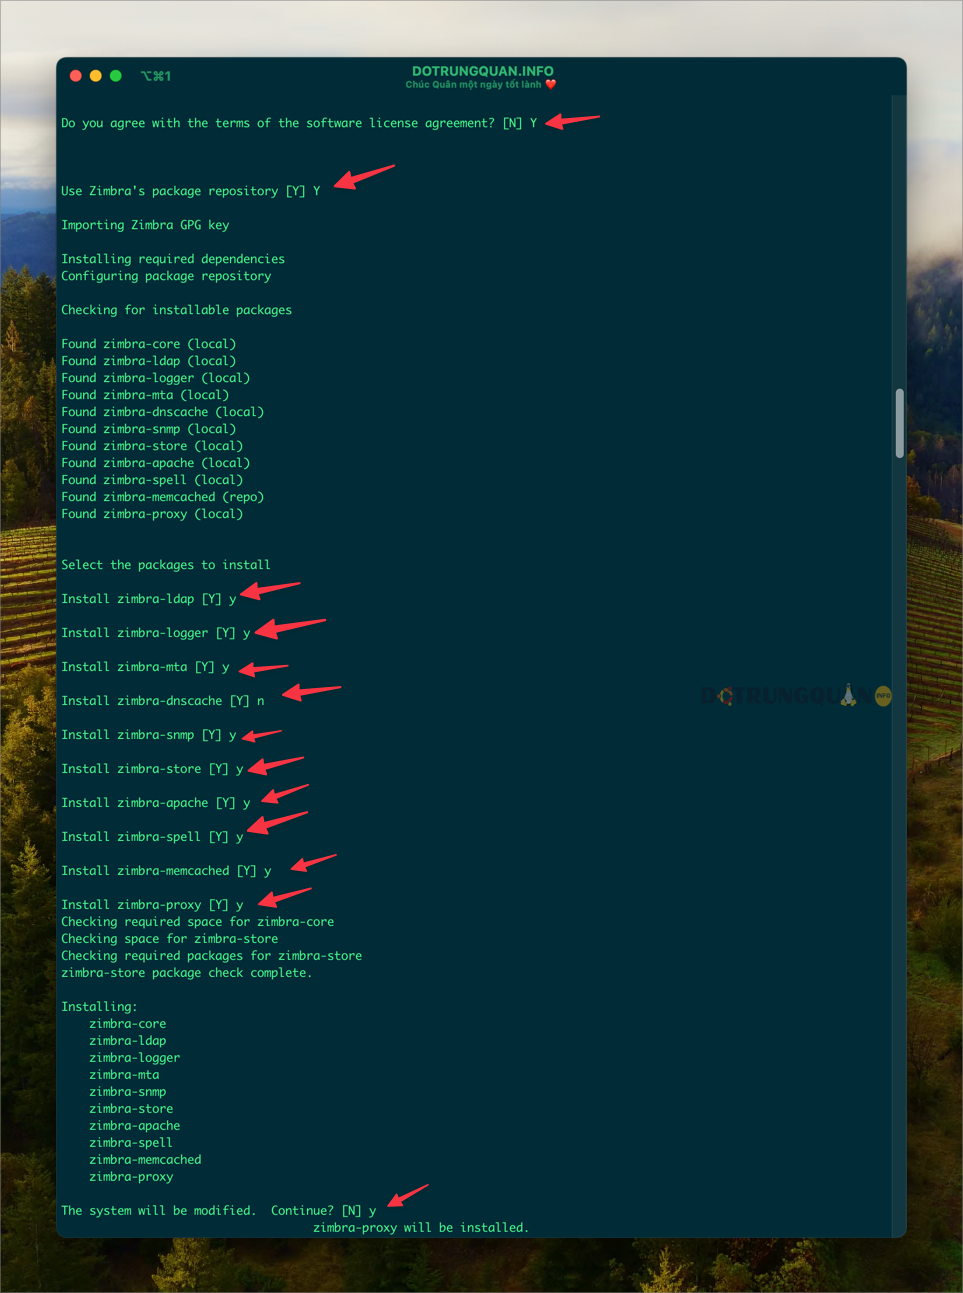
Quá trình cài đặt sẽ yêu cầu bạn chọn Y/N. Và bạn hãy chọn theo ảnh chỉ dẫn của tôi.

Nếu bạn nhận được thông báo DNS ERROR resolving MX for bạn hãy nhập Yes và nhập tên miền vào như ảnh sau.

Tiếp theo bạn gõ 6 rồi gõ 4 để cung cấp mật khẩu cho admin. Sử dụng mật khẩu mạnh cho admin. Gõ r để đến menu trước. Gõ a và yes để xử lý cài đặt
Main menu

   1) Common Configuration:
   2) zimbra-ldap:                             Enabled
   3) zimbra-logger:                           Enabled
   4) zimbra-mta:                              Enabled
   5) zimbra-snmp:                             Enabled
   6) zimbra-store:                            Enabled
        +Create Admin User:                    yes
        +Admin user to create:                 [email protected]
******* +Admin Password                        UNSET
        +Anti-virus quarantine user:           [email protected]
        +Enable automated spam training:       yes
        +Spam training user:                   [email protected]
        +Non-spam(Ham) training user:          [email protected]
        +SMTP host:                            mail.myip.info.vn
        +Web server HTTP port:                 8080
        +Web server HTTPS port:                8443
        +Web server mode:                      https
        +IMAP server port:                     7143
        +IMAP server SSL port:                 7993
        +POP server port:                      7110
        +POP server SSL port:                  7995
        +Use spell check server:               yes
        +Spell server URL:                     http://mail.myip.info.vn:7780/aspell.php
        +Enable version update checks:         TRUE
        +Enable version update notifications:  TRUE
        +Version update notification email:    [email protected]
        +Version update source email:          [email protected]
        +Install mailstore (service webapp):   yes
        +Install UI (zimbra,zimbraAdmin webapps): yes

   7) zimbra-spell:                            Enabled
   8) zimbra-proxy:                            Enabled
   9) Default Class of Service Configuration:
   s) Save config to file
   x) Expand menu
   q) Quit

Address unconfigured (**) items  (? - help) 6


Store configuration

   1) Status:                                  Enabled
   2) Create Admin User:                       yes
   3) Admin user to create:                    [email protected]
** 4) Admin Password                           UNSET
   5) Anti-virus quarantine user:              [email protected]
   6) Enable automated spam training:          yes
   7) Spam training user:                      [email protected]
   8) Non-spam(Ham) training user:             [email protected]
   9) SMTP host:                               mail.myip.info.vn
  10) Web server HTTP port:                    8080
  11) Web server HTTPS port:                   8443
  12) Web server mode:                         https
  13) IMAP server port:                        7143
  14) IMAP server SSL port:                    7993
  15) POP server port:                         7110
  16) POP server SSL port:                     7995
  17) Use spell check server:                  yes
  18) Spell server URL:                        http://mail.myip.info.vn:7780/aspell.php
  19) Enable version update checks:            TRUE
  20) Enable version update notifications:     TRUE
  21) Version update notification email:       [email protected]
  22) Version update source email:             [email protected]
  23) Install mailstore (service webapp):      yes
  24) Install UI (zimbra,zimbraAdmin webapps): yes

Select, or 'r' for previous menu [r] 4

Password for [email protected] (min 6 characters): [rNiT0ttVgK] rNiT0ttVgK

Store configuration

   1) Status:                                  Enabled
   2) Create Admin User:                       yes
   3) Admin user to create:                    [email protected]
   4) Admin Password                           set
   5) Anti-virus quarantine user:              [email protected]
   6) Enable automated spam training:          yes
   7) Spam training user:                      [email protected]
   8) Non-spam(Ham) training user:             [email protected]
   9) SMTP host:                               mail.myip.info.vn
  10) Web server HTTP port:                    8080
  11) Web server HTTPS port:                   8443
  12) Web server mode:                         https
  13) IMAP server port:                        7143
  14) IMAP server SSL port:                    7993
  15) POP server port:                         7110
  16) POP server SSL port:                     7995
  17) Use spell check server:                  yes
  18) Spell server URL:                        http://mail.myip.info.vn:7780/aspell.php
  19) Enable version update checks:            TRUE
  20) Enable version update notifications:     TRUE
  21) Version update notification email:       [email protected]
  22) Version update source email:             [email protected]
  23) Install mailstore (service webapp):      yes
  24) Install UI (zimbra,zimbraAdmin webapps): yes

Select, or 'r' for previous menu [r] r

Main menu

   1) Common Configuration:
   2) zimbra-ldap:                             Enabled
   3) zimbra-logger:                           Enabled
   4) zimbra-mta:                              Enabled
   5) zimbra-snmp:                             Enabled
   6) zimbra-store:                            Enabled
   7) zimbra-spell:                            Enabled
   8) zimbra-proxy:                            Enabled
   9) Default Class of Service Configuration:
   s) Save config to file
   x) Expand menu
   q) Quit

*** CONFIGURATION COMPLETE - press 'a' to apply
Select from menu, or press 'a' to apply config (? - help) a
Save configuration data to a file? [Yes] yes
Save config in file: [/opt/zimbra/config.58152]
Saving config in /opt/zimbra/config.58152...done.
The system will be modified - continue? [No] yes
Operations logged to /tmp/zmsetup.20240731-150248.log
Setting local config values...
Khi nhận được thông báo Notify Zimbra of your installation? bạn có thể chọn Yes hoặc No để thông báo cho Zimbra về việc cài đặt của bạn.

Sau khi cài bạn hãy kiểm tra dịch vụ có hoạt động hay không bằng lệnh sau
su - zimbra
zmcontrol status
Bước 3: Vô hiệu Modern UI
Vì Modern UI không khả dụng với Zimbra OSE, nên bạn cần tắt nó.
zmprov mcf zimbraModernWebClientDisabled TRUE
zmprov mc default zimbraPrefClientType advanced
Bước 4: Kiểm tra sau cài đặt
Để truy cập vào Zimbra bạn có thể truy cập vào Zimbra thông qua các địa chỉ sau.
- https://ip_server:7071
- https://mail.domain:7071
Sau đó bạn vào mục Cấu Hình => Lớp dịch vụ => Sửa mục Default => Tuỳ Chọn và sửa lại Múi giờ +7


Và một điều đặc biệt là đối với Zimbra 10 bạn có thể sử dụng App Zimbra trên AppStore và đăng nhập.


